Warning: Deprecated articles
You are using the old version of the knowledge base for yunIO.
Make sure to use the samples within the new HelpCenter for yunIO.
The following article shows how to integrate yunIO with Microsoft Power Automate and the Microsoft AI Builder.
AI Builder enables the usage of artificial intelligence to automate processes in Power Apps and Power Automate.
Microsoft offers pre-built AI models to start using the tool without training the AI model first.
About #
The depicted example scenario uses an AI Builder template in Power Automate to automatically extract and post invoice information to the backend SAP ERP system. In the SAP system an incoming invoice for a previously created purchase order is booked.
Prerequisites #
- The process for incoming invoice creation must be customized and ready to use in SAP.
- Test the BAPI/function call in SAP with transaction SE37 before building the web service. Note which parameters are needed for the call.
Creating a Service in yunIO #
Create a yunIO service for incoming invoices.
Note: The parameters that are needed to create an incoming invoice are dependent on your customized SAP settings for the invoicing process.
- Create a service in yunIO. Select Function Module / BAPI as the extraction type for the service.
The depicted example uses the BAPI_INCOMINGINVOICE_CREATE1 to create an incoming invoice in SAP. - Set the following import parameters to Supplied by Caller (Structure HEADERDATA):
- INVOICE_IND (Indicator: post invoice)
- DOC_TYPE (Document Type)
- DOC_DATE (Document Date in Document)
- PSTNG_DATE (Posting Date in the Document)
- COMP_CODE (Company Code)
- DIFF_INV (Different Invoicing Party)
- CURRENCY (Currency Key)
- CURRENCY_ISO (ISO currency code)
- GROSS_AMOUNT (Gross Invoice Amount in Document Currency)
- PMNTTRMS (Terms of Payment Key)
- BLINE_DATE (Baseline Date for Due Date Calculation)
- PMNT_BLOCK (Payment Block Key)
- PYMT_METH (Payment Method)
- PMTMTHSUPL (Payment Method Supplement)
- INVOICESTATUS (Invoice Document Status)
- INVOICE_IND (Indicator: post invoice)
- Select export parameters FISCALYEAR (Fiscal Year) and INVOICEDOCUMENTNUMBER (Document Number of an Invoice Document) for the output.
- Select the Table RETURN for the output.
- Set the following fields of table ITEMDATA to Supplied by Caller:
- INVOICE_DOC_ITEM (Document Item in Invoice Document)
- PO_NUMBER (Purchase Order Number)
- PO_ITEM (Item Number of Purchasing Document)
- ITEM_AMOUNT (Amount in document currency)
- QUANTITY (Quantity)
- PO_UNIT (Purchase Order Unit of Measure)
- INVOICE_DOC_ITEM (Document Item in Invoice Document)
- Click
 to testrun the service in yunIO (1). For more information, see Online Help: Testing a Service.
 - Click
 to download the service definition (2).

Configuring a yunIO Custom Connector in Power Automate #
To use the service created in Creating a Service in yunIO with Power Automate, it must be available as a custom connector in Power Automate. For information on how to integrate a yunIO service with Power Automate, see Integrating a yunIO Service with Power Automate.
Note: When integrating services from a local yunIO installation with a cloud hosted platform like Power Automate, a gateway to tunnel the connection is recommended, e.g., the Microsoft On-premises data gateway. For more information about yunIO networking settings, see yunIO Networking Scenarios.
Creating a Power Automate Flow for Invoice processing #
The following workflow automatically extracts invoicing information with the AI Builder tool from random invoicing PDF files and posts this information to SAP.
- Follow the steps described in the Microsoft AI Builder Documentation to create a new Power Automate flow that uses the invoice processing pre-built model of AI Builder.
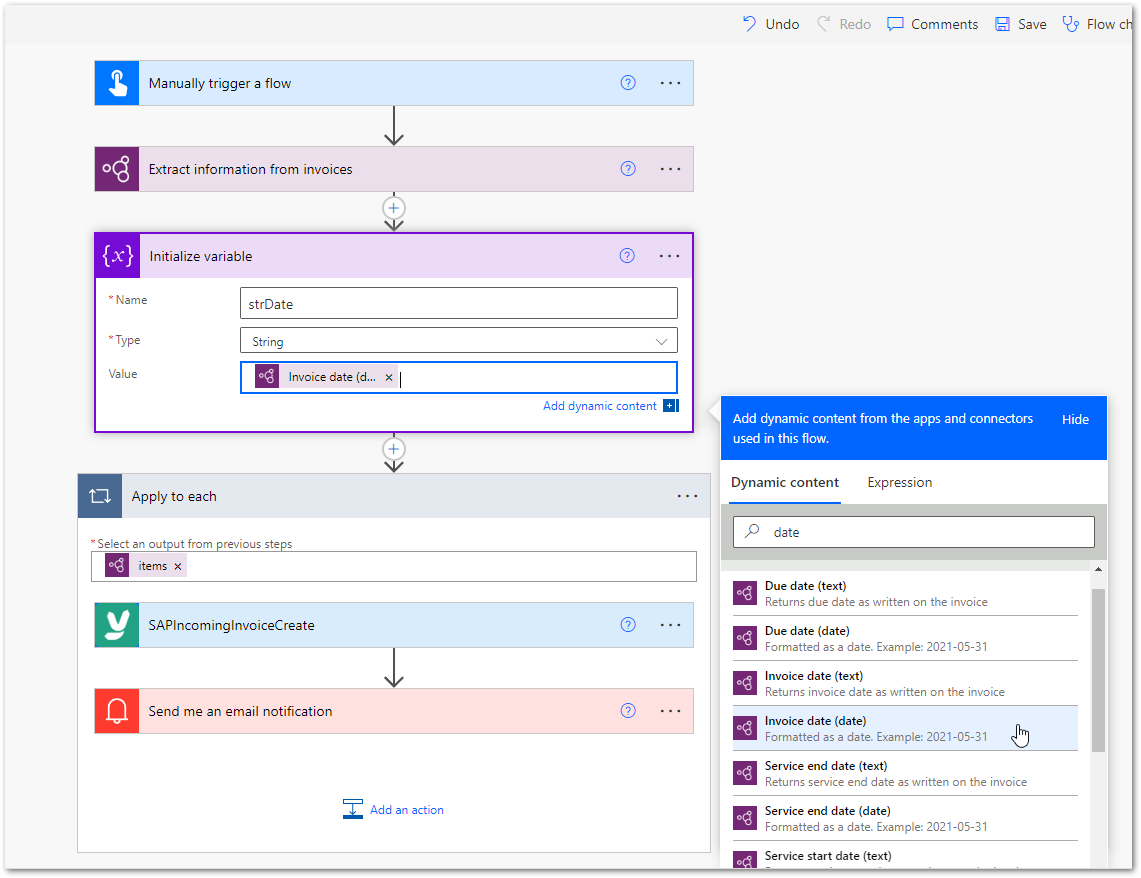
- Add an Initialize variable action after the AI Builder action. This variable is used to automatically convert extracted dates into an SAP compliant format.
- Map the field Invoice Date (Date) returned from the AI Builder action to field Value of the Initialize variable action.
For simplicity reasons this example uses only one date variable for the fields DOC_DATE, PSTNG_DATE and BLING_DATE.
- Add the yunIO custom connector for incoming invoice creation.
- Map the required output fields of the AI Builder action to the matching parameters of the custom connector.
Keep in mind that some fields need fixed values required by SAP (INVOICESTATUS, INVOICE_IND,…), while others need output values from the invoice document extracted with the AI Builder action (DOC_DATE,…).
Because the table ITEMDATA is used in a BAPI that can process multiple invoice items, Power Automate automatically sets an Apply to each action as the next workflow step. This example demonstrates a simple case with a single invoice line item.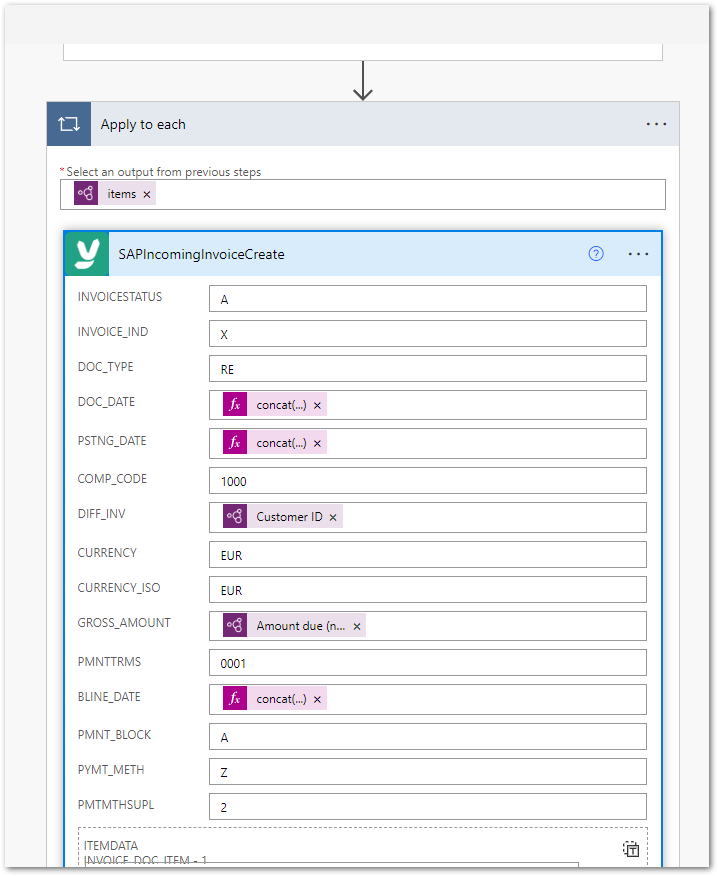
- Use an expression to automatically convert the date fields into an SAP compliant format, see Formats and Conversions in Power Automate.
- Optional: Add an email notification action to get notified about the newly created incoming invoice.
Use the output parameters INVOICEDOCNUMBER and FISCALYEAR in the notification email to see if the invoice was successfully created.
Other SAP output information (i.e. table RETURN) can be extracted to analyze the data in case of workflow failures.

- Publish the workflow.
Note: Note that the values used in this example might not be valid for your SAP system. In your case other (fixed) values might be necessary to run the process.
Test the Workflow #
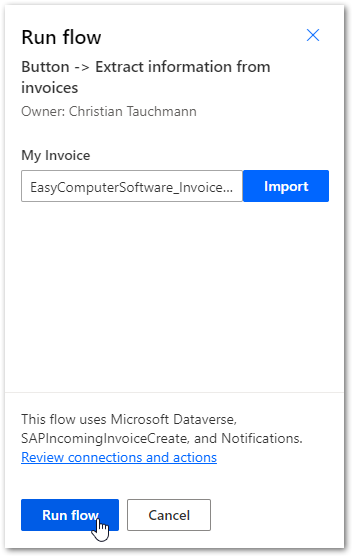
- Upload a suitable invoice PDF-document.
If needed, download a sample EXCEL file (.xlsx) that can be used as an invoice document.
Note that a purchase order on which the incoming invoice can be booked, must already exist in the SAP ERP system. For more information on incoming invoices, see SAP Documentation: Incoming Invoice.
- Check if the workflow steps are successfully executed one after the other.
- Check if an incoming invoice is created in SAP.