This article shows how to synchronize Dynamics 365 Business Central with SAP.
In the following scenario, data from Dynamics 365 Business Central is used to automatically create customer master data in SAP.
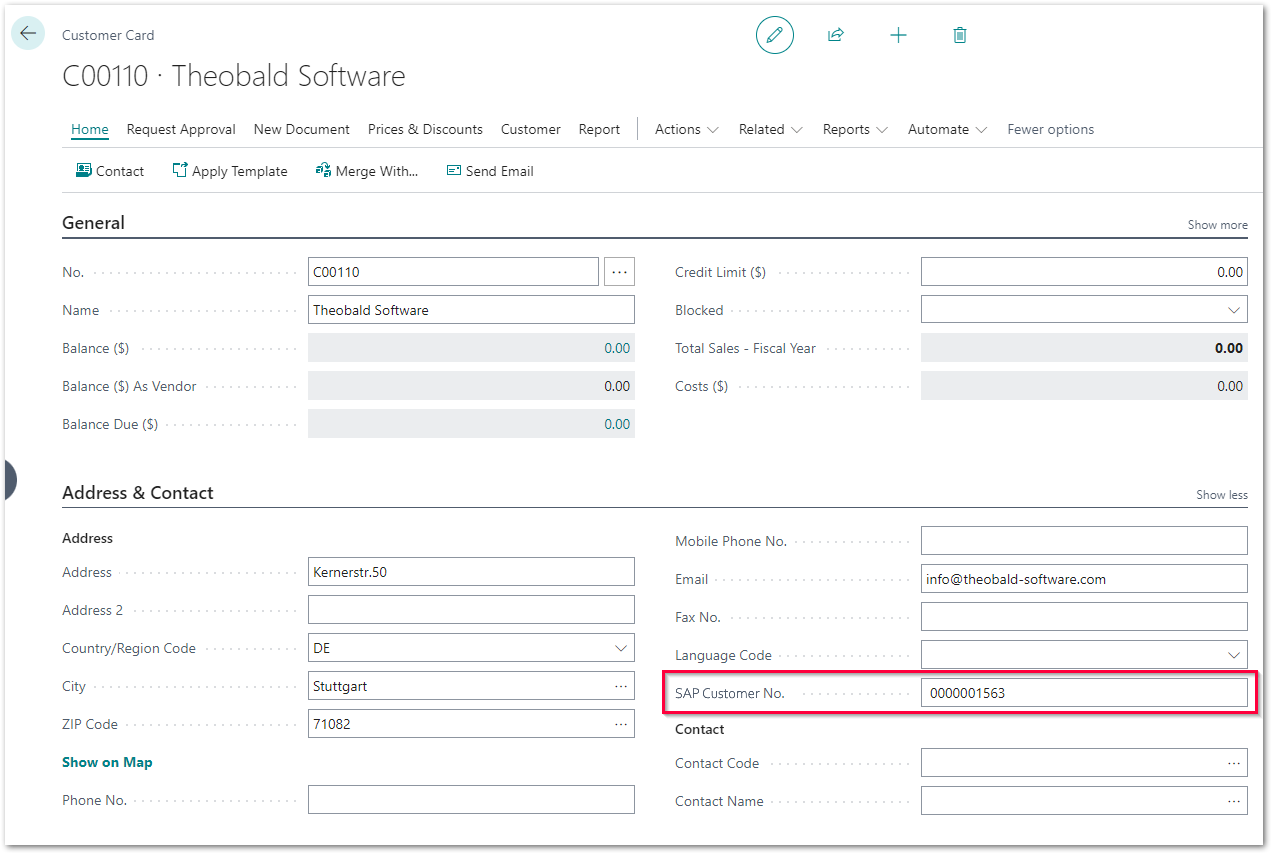
The newly created SAP customer number is then written back to Dynamics 365 Business Central.
About #
This article leads you through all necessary steps to set up the following process:
- When a customer account in Dynamics 365 Business Central is modified, a Power Automate workflow is triggered.
- The workflow checks if the customer exists in SAP.
- If the customer does not exist, a yunIO service writes the customer data from Dynamics 365 Business Central to SAP.
- If the customer is successfully created in SAP, the new SAP customer number is written back to Dynamics 365 Business Central.
Setup in yunIO #
yunIO is the connector that reads and writes data from and to SAP.
For more information on yunIO, see Theobald Software: yunIO.
Follow the steps below to set up a yunIO service that adds customers to the customer master data in SAP:
- Define a connection to your SAP system in yunIO.
- Create a new service in yunIO. This example uses the integration type Function Module for the service.
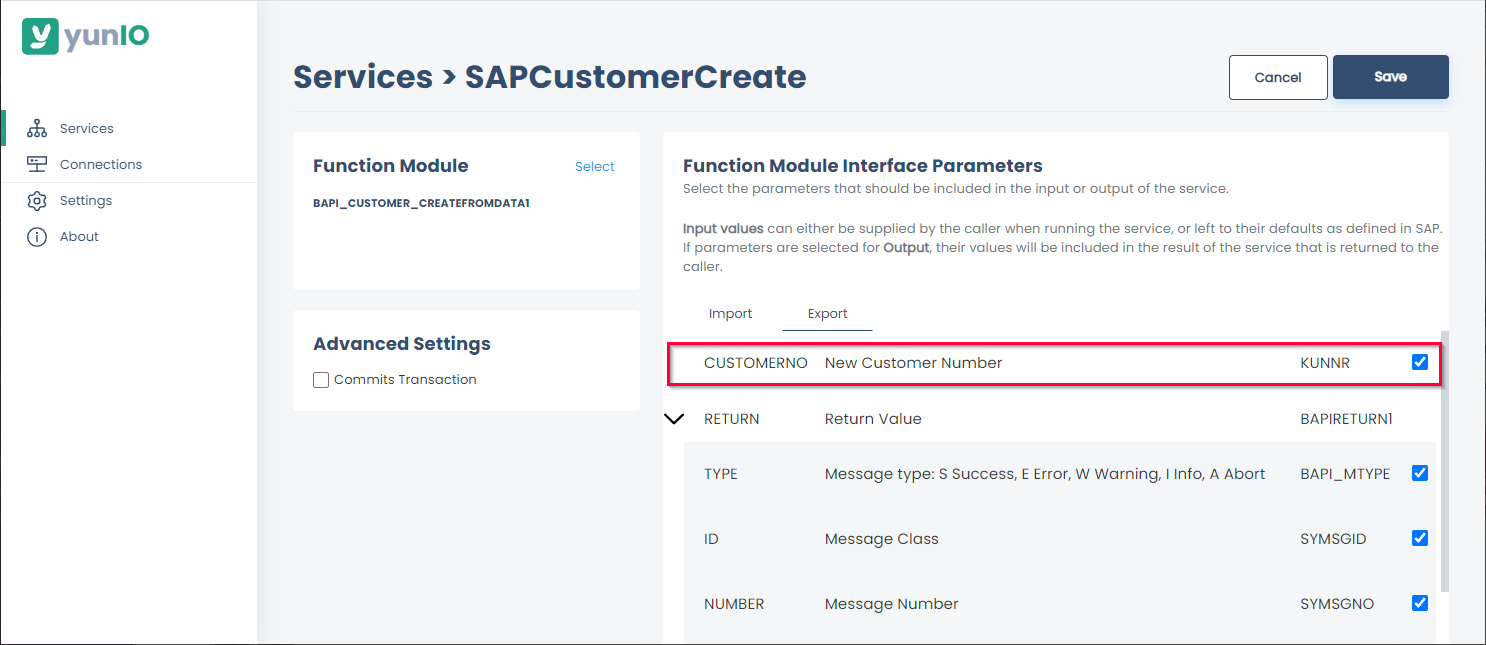
- Look up the standard BAPI BAPI_CUSTOMER_CREATEFROMDATA1 that creates customers in SAP.
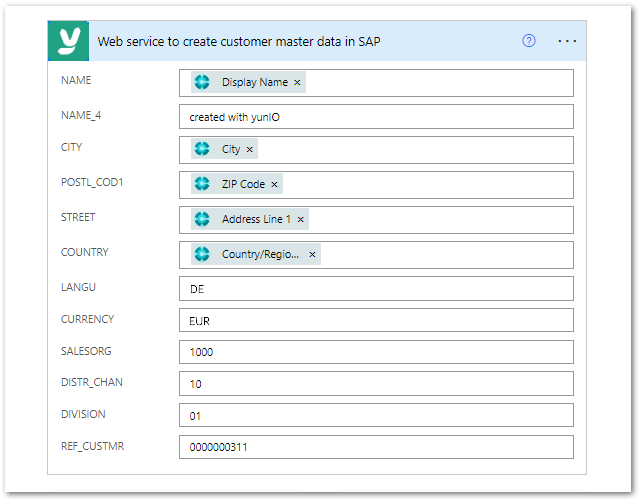
- Set all import parameters you want to transfer from Dynamics 365 Business Central to SAP to Supplied by Caller e.g., NAME, CITY, POSTL_COD1, STREET, etc.
- Select CUSTOMERNO for export. This Export parameter contains the newly created SAP customer number that is written back to Dynamics 365 Business Central.
- Click
 to testrun the service in yunIO (1). For more information, see Online Help: Testing a Service.
 - Click
 to download the service definition (2).

Setup in Dynamics 365 #
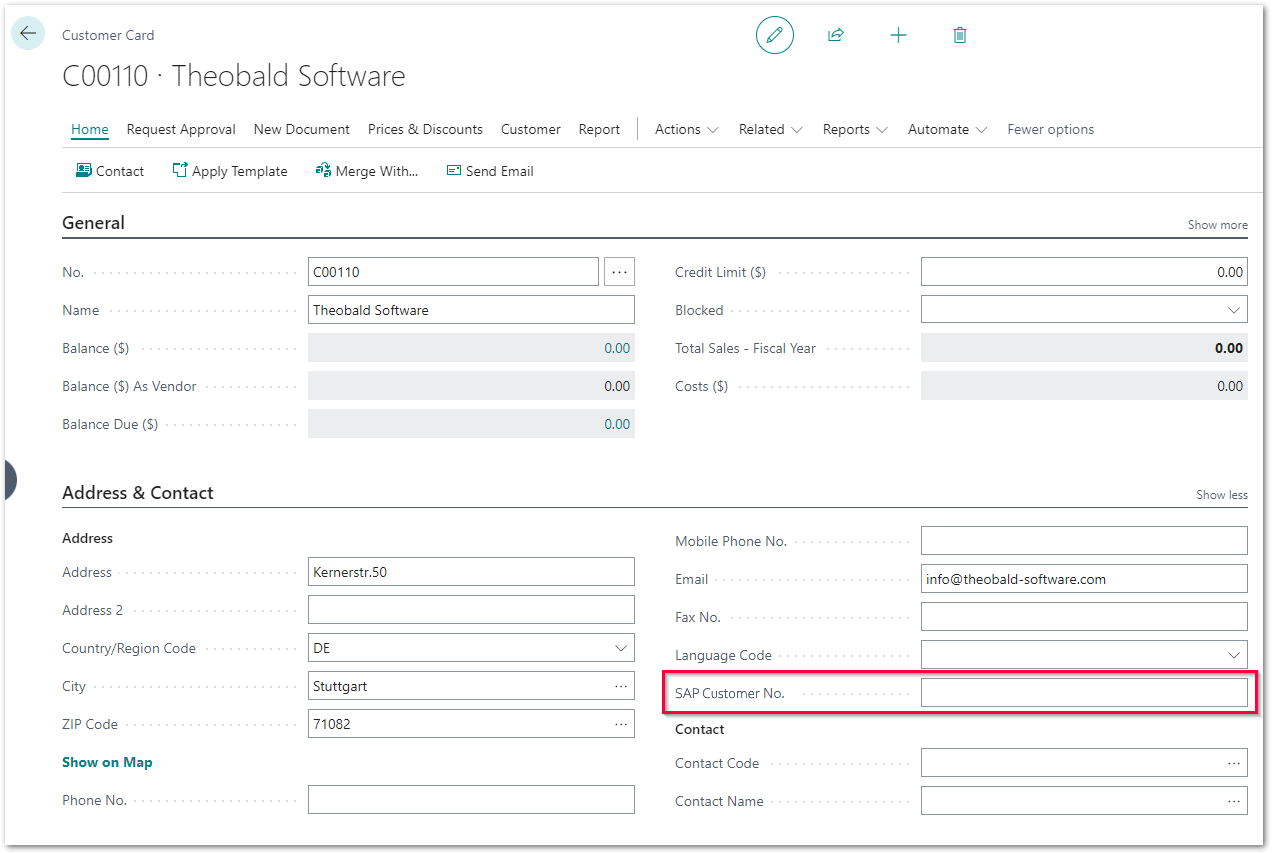
Customize your Business Central account to provide SAP-related fields, e.g., SAP customer number.
Business Central’s personalization options do not include the creation of custom fields.
Use custom development or one of multiple available add-ons for Dynamics 365 Business Central to create custom fields.
For more information on how to customize table fields via custom development, see Microsoft Documentation: Development - Table Object.
Note: Creating Sales Org, Distribution Channel and Division in Dynamics 365 Business Central is optional as they can also be set as static values in Power Automate.
Setup in Power Automate #
Follow the steps below to synchronize customer data in Dynamics 356 Business Central with customer data in SAP:
- Integrate the yunIO service created in Setup in yunIO as a custom connector in Power Automate, see Integrating a yunIO Service with Power Automate.
- Create a new workflow that is triggered when a customer data is modified in the Dynamics 365 Business Central table customers.
- Use a RowID to keep track of the modified record.
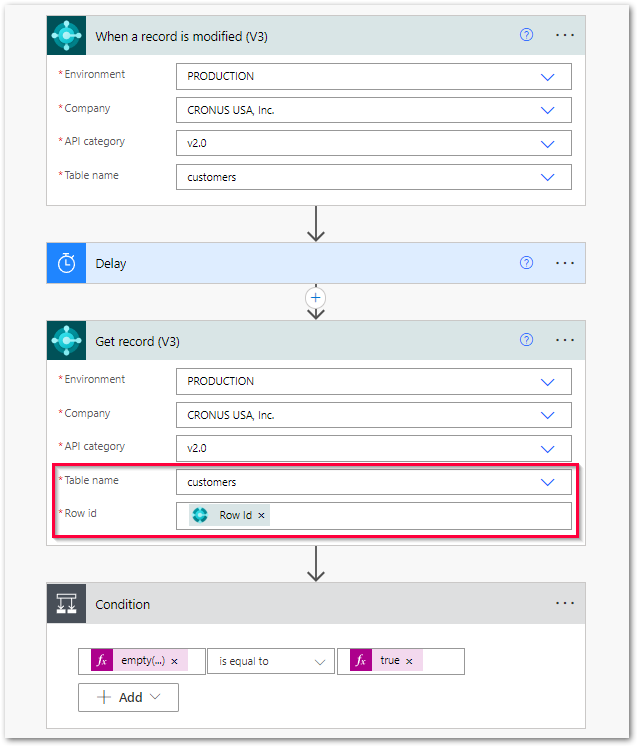
- Check if the custom field “SAP Customer Number” created in Setup in Dynamics 365 is empty.
If the customer does not have an SAP customer number, the customer is created in SAP. - Add the yunIO connector created in step 1 to the workflow and map the customer data from Dynamics 365 Business Central to the input parameters of the yunIO custom connector.
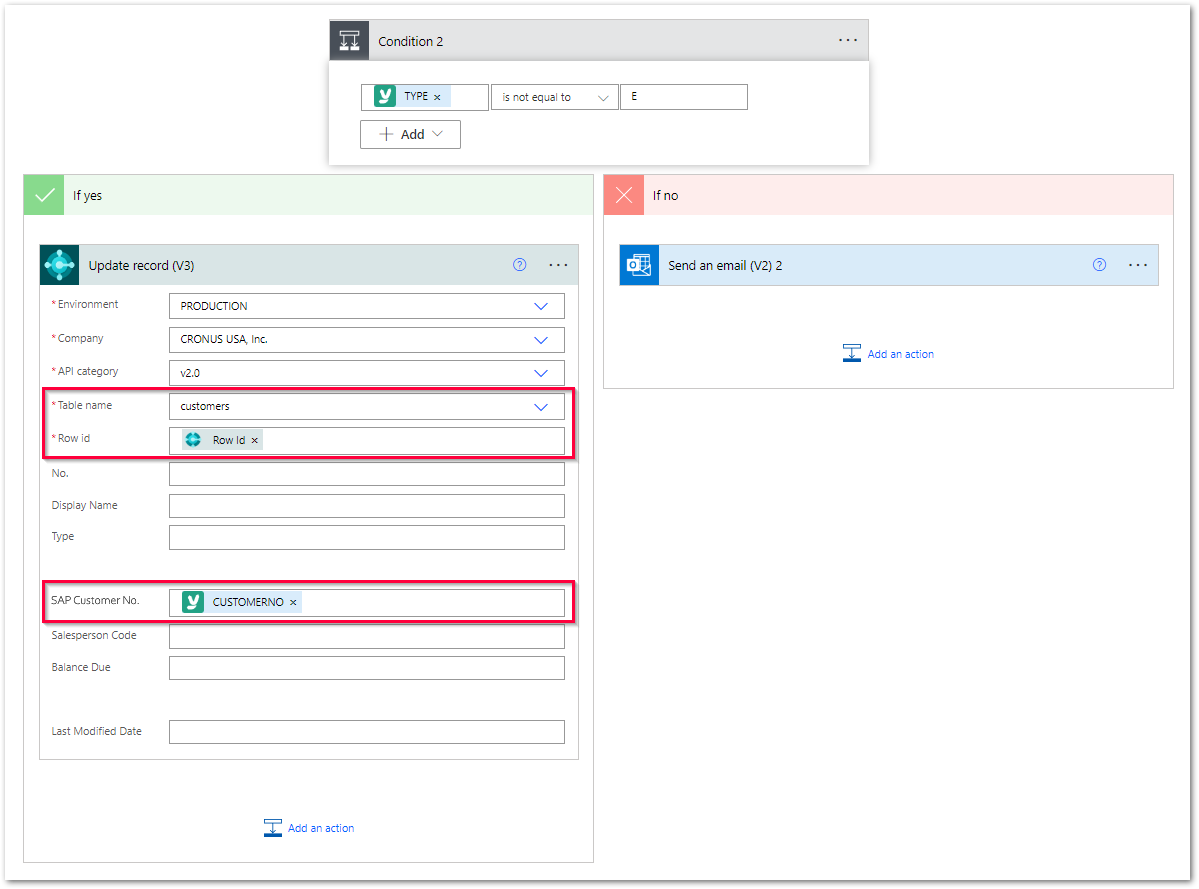
- Check if the SAP customer was created using the yunIO return field TYPE (5).
If TYPE does not equal ‘E’ (error), the SAP customer number is written back to Dynamics 365 Business Central. - Add a Business Central Update Record tool to write the SAP customer number returned by the yunIO custom connector back to Business Central.
- Use the RowID of the workflow trigger to pass the SAP customer number to the modified record in Dynamics 365 Business Central.
- Optional: if the customer already has an SAP customer number, use the SAP customer number to call a yunIO service that changes SAP customer data to synchronize the modified data.
- Turn on the workflow.
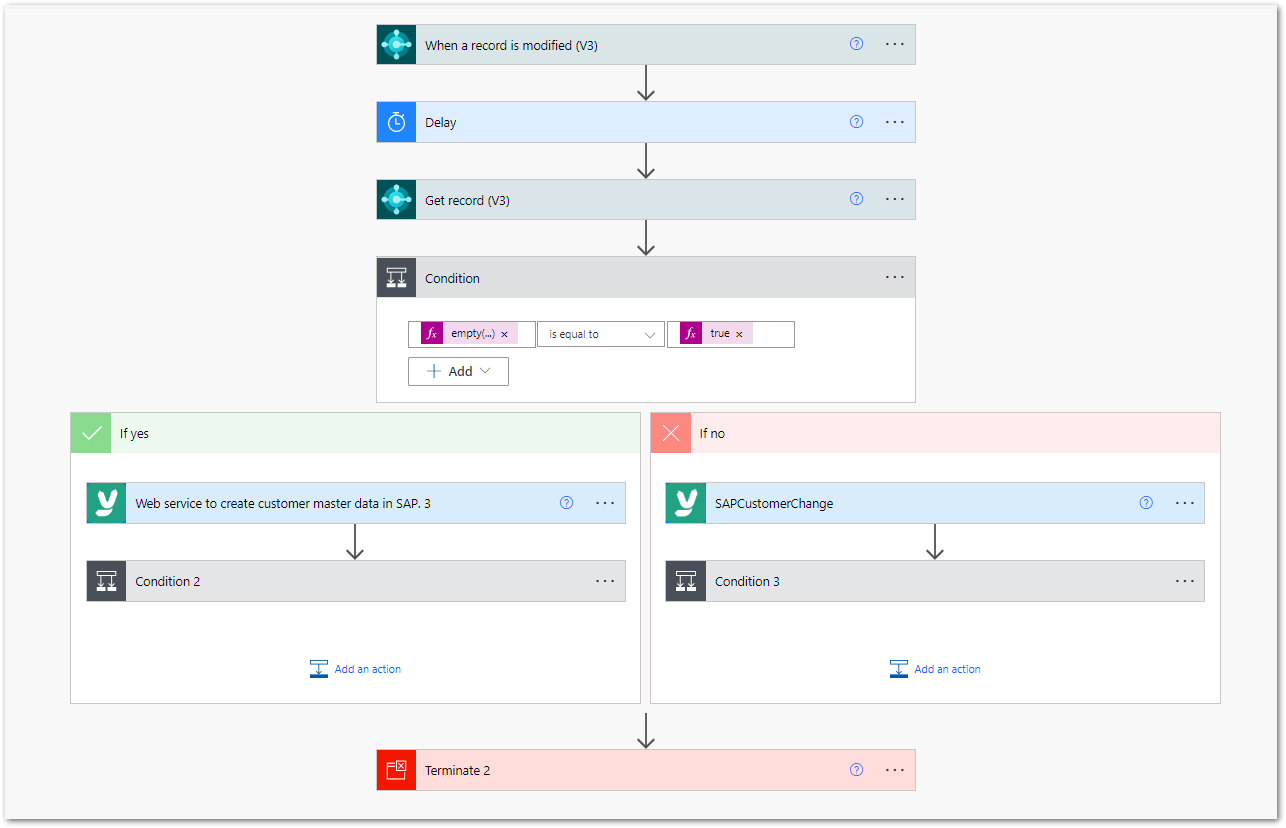
Note: As of Business Central 2022 wave 2 (BC21) any changes in Dynamics 365 Business Central are saved automatically. To avoid triggering the Power Automate workflow multiple times due to auto-save actions, add a Delay tool after the workflow trigger or schedule the SAP synchronization, e.g., once a day.
Triggering the Process #
- Open Dynamics 365 Business Central and add a new customer.
- The Power Automate workflow runs and creates the customer in SAP.
- Check if the SAP customer number is written back to Dynamics 365 Business Central.