Warning: Deprecated articles
You are using the old version of the knowledge base for yunIO.
Make sure to use the samples within the new HelpCenter for yunIO.
This article shows how to integrate a yunIO service with Alteryx.
Alteryx is a software platform, which allows accessing, cleansing, testing, combining and analyzing output data.
For more Information on Alteryx, see Alteryx Official Website.
Integrating yunIO in Alteryx #
yunIO is the connector, which reads and writes data from and to SAP. For more information on yunIO, see Theobald Software: yunIO.
- Open or create a new Alteryx workflow.
- Add a Download tool to your workflow.
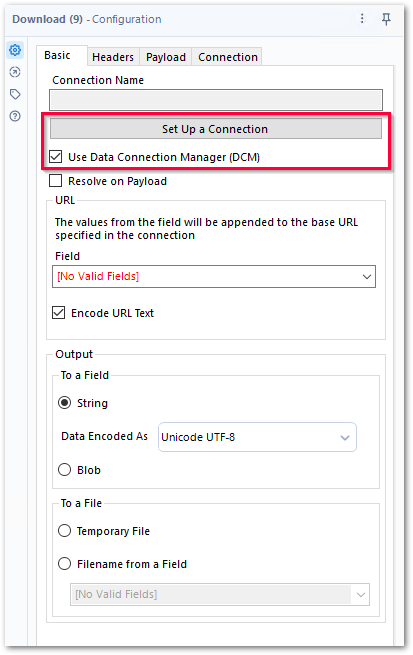
- In the Configuration section of the Download tool, activate the option Use Data Connection Manager (DCM) and click [Set Up Connection]. The Alteryx Data Connection Manager (DCM) opens.
- Click [New] to create a new data source.
- Enter a name for the connection.
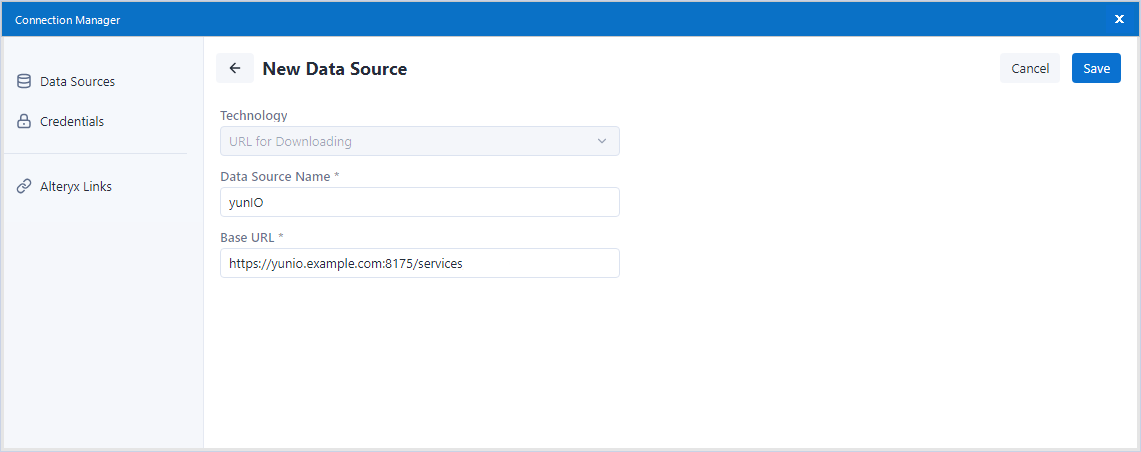
- Copy the Base URL of your yunIO instance into the field Base URL.
- Click [Save]. The subsection Connection is displayed.
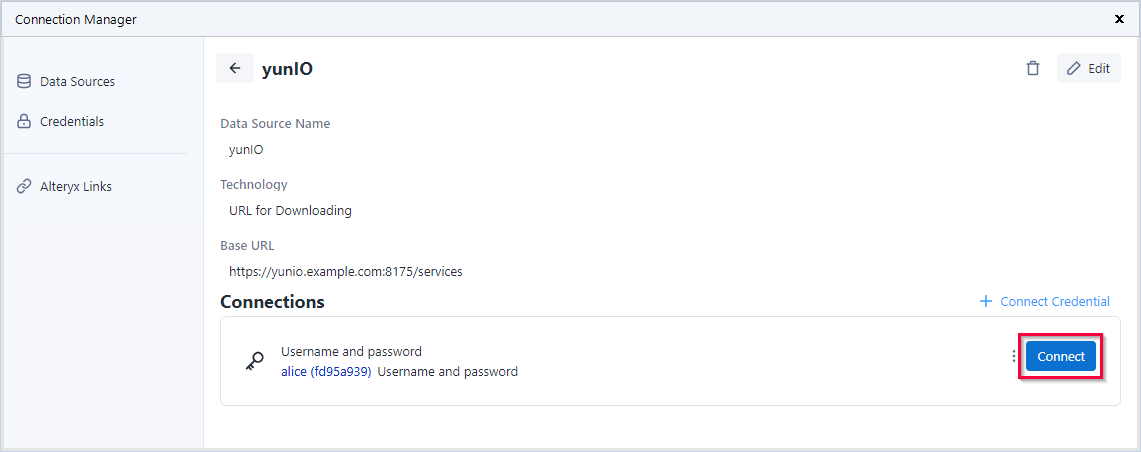
- In the subsection Connection select one of the following authentication methods:
- No Credentials (if no authentication is set up in yunIO).
- Username (if no authentication is set up in yunIO).
- Username and password (if Basic Authentication is set up in yunIO, see yunIO Online Help: Access Control).
- Select an existing credential or click + Connect Credential to create a new credential that can access and run yunIO services.
- Click [Link] / [Create and link] to link the credential to the connection.

- Click [Connect] to establish a connection to yunIO. The Data Connection Manager closes.
- Use the name of a yunIO service as input for the Download tool to call the service.
For more information about calling and passing parameters to yunIO services, see Calling yunIO Services in Alteryx.
For more information about the Alteryx Download tool, see Alteryx Designer Documentation: Download-Tool.
Calling yunIO Services in Alteryx #
Follow the steps below to call yunIO services in Alteryx:
- Define a connection to your SAP system in yunIO.
- Create a new service in yunIO.
This example uses a yunIO transaction service that changes customer master data in SAP, see Working with Transaction XD02.
- Open or create a new Alteryx workflow.
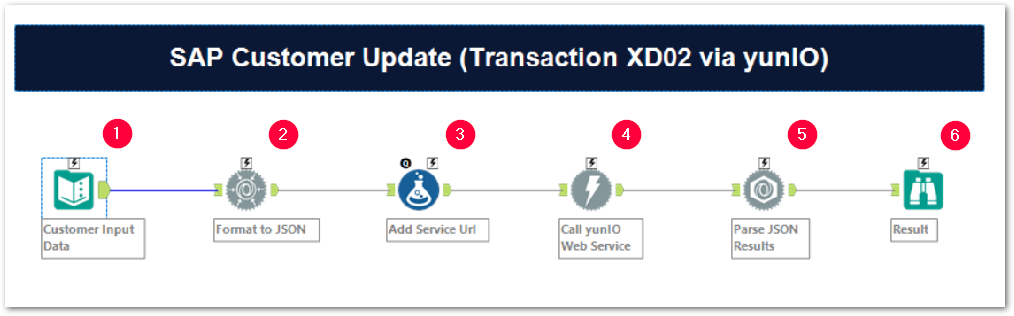
-
Add an Input Data tool (1) that provides values for the input parameters of the yunIO service. Example:
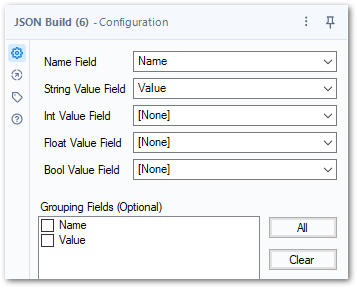
Name Value 1 skipPopups false 2 CustomerNo 1001 3 Name The Fresh Loaf 4 Street Washington Boulevard 5 HouseNo 1000 6 PostalCode 65936 7 City Frankfurt 8 Country DE 9 Region 06 10 Phone 069-467653-0 - Add a JSON Build tool (2) to format the input data into a JSON format that can be processed by the yunIO service. Example:
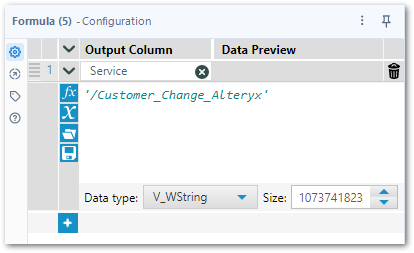
- Add a Formula tool (3) to add a new column Service to the result of the JSON Build tool.
The column contains the name of the service you want to call e.g.,
/Customer_Change_Alteryx.
- Add a Download tool (4) to your workflow and set up a connection to yunIO, see Integrating yunIO in Alteryx.
- Select the Service column that contains the name of the service as the input for the URL field. Make sure that the combination of the base URL and the service name represents a valid URL e.g.,
https://yunio.example.com:8175/services/Customer_Change_Alteryx.

- Add a JSON Parse tool (5) to parse the JSON results returned by the service.
- Add a Browse tool (6) to view the parsed result message of the yunIO service.
- Run the workflow. If the run is successful, the workflow returns the following message:
“Changes have been made”.
You can download the Alteryx workflow for this application here: yunIO_Customer_Update.yxwz