The following article shows how to create a custom connector in Matillion Data Loader that loads SAP data via Xtract Universal into Snowflake.
Matillion Data Loader is a cloud based data loading platform that extracts data from popular sources and loads it into cloud destinations, see Official Website: Matillion Data Loader.
Prerequisites #
- Matillion Hub Account, see Official Website.
- Snowflake Destination for the Matillion Data Loader pipeline, see Matillion Documentation: Destinations - Set up Snowflake.
- Xtract Universal must be accessible via the internet, e.g., by hosting Xtract Universal on a webserver with a static IP address or via third party tools like ngrock.
Setup in Xtract Universal #
- Create an extraction in Xtract Universal, see Online Help: Defining an Extraction.
The depicted example scenario extracts the SAP table KNA1 (General Data in Customer Master).
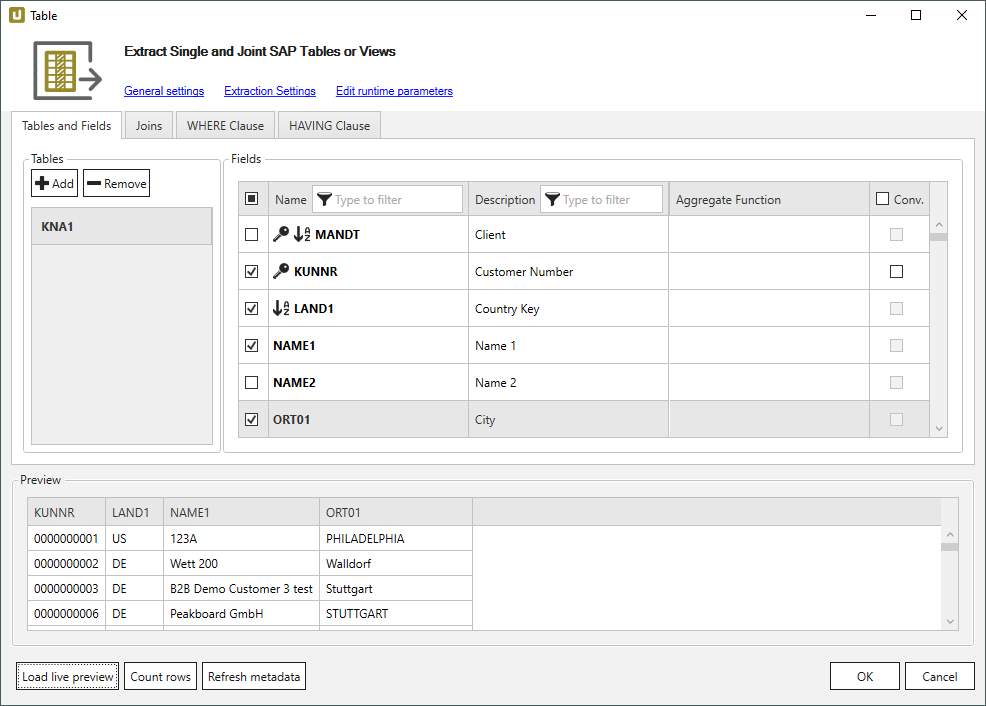
- Assign the
http-jsondestination to the extraction, see Online Help: Assigning Destinations.
Create a Custom Connector in Matillion #
To extract SAP data via Xtract Universal you must define a custom connector that contains the connection details of Xtract Universal, see Matillion Documentation: Matillion Custom Connector Overview.
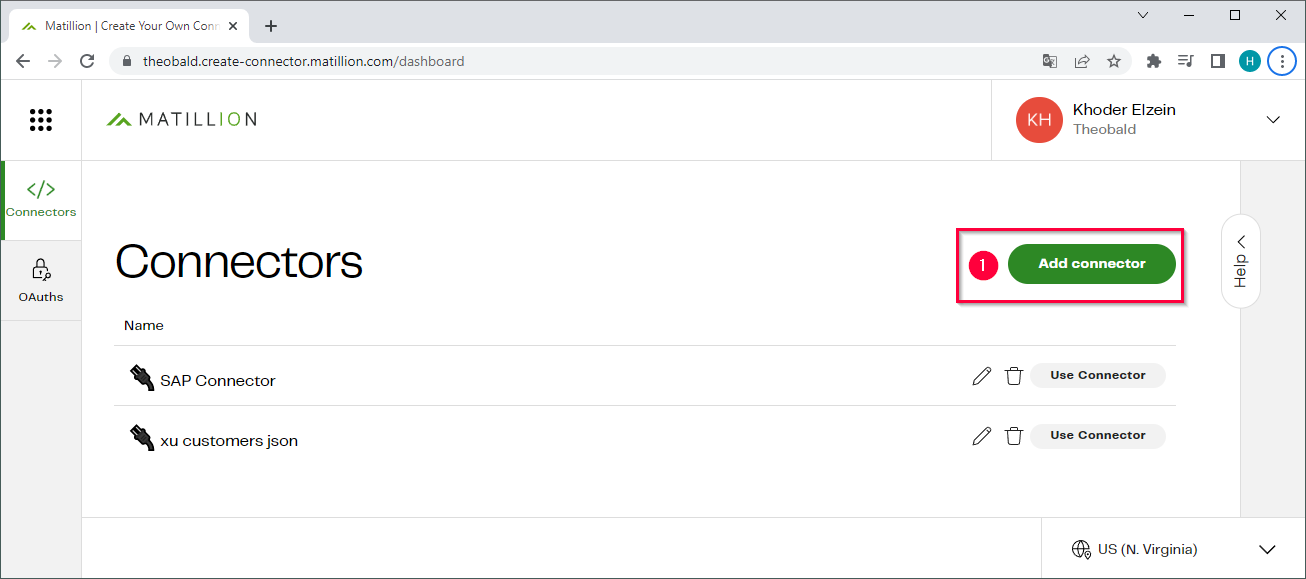
- Open the website https://create-connector.matillion.com/ and log in to create the custom connector.
- Click [Add Connector] (1) to create a new custom connector.
- Click on the
 icon to change the name of the connector (2).
 - Copy the URL the extraction into the designated input field and select
GETas the http method (3).
The URL has the following format:<Protocol>://<HOST or IP address>:<Port>/?name=<Name of the Extraction>{&<parameter_i>=<value_i>}
Example: the URLhttps://6606-185-114-89-133.eu.ngrok.io/?name=kna1calls the extraction “kna1” via ngrock. For more information about calling extractions via web services, see Online Help: Call via Webservice.
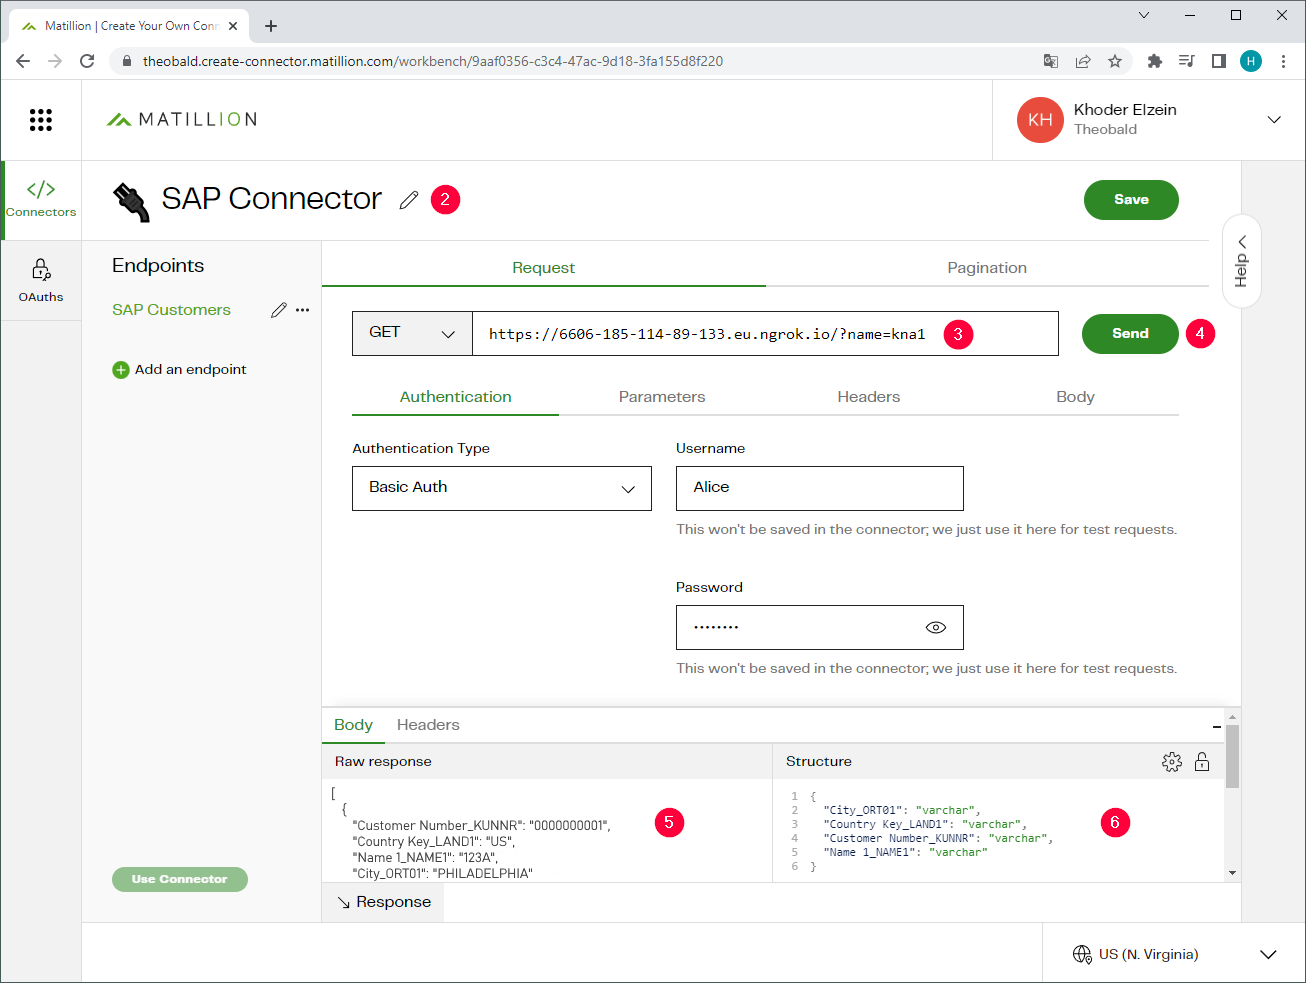
- To test the connection, enter your authentication details and click [Send] (4). If the connection is successful, the http response contains the SAP customer data extracted by Xtract Universal (5).
- Click on the
 icon to edit the structure (names and data types) of the http response (6).
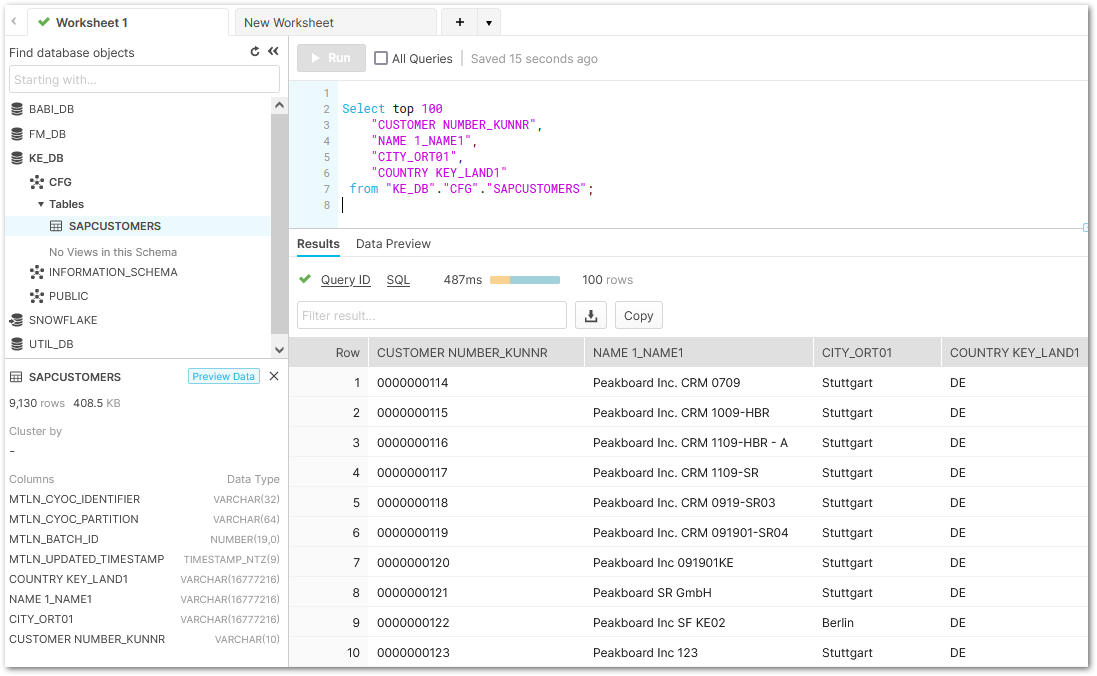
The structure is used when loading data into your destination. This example scenario only extracts the KNA1 columns City_ORT01, Name 1_NAME1, Country Key_LAND1 and Customer Number_KUNNR.

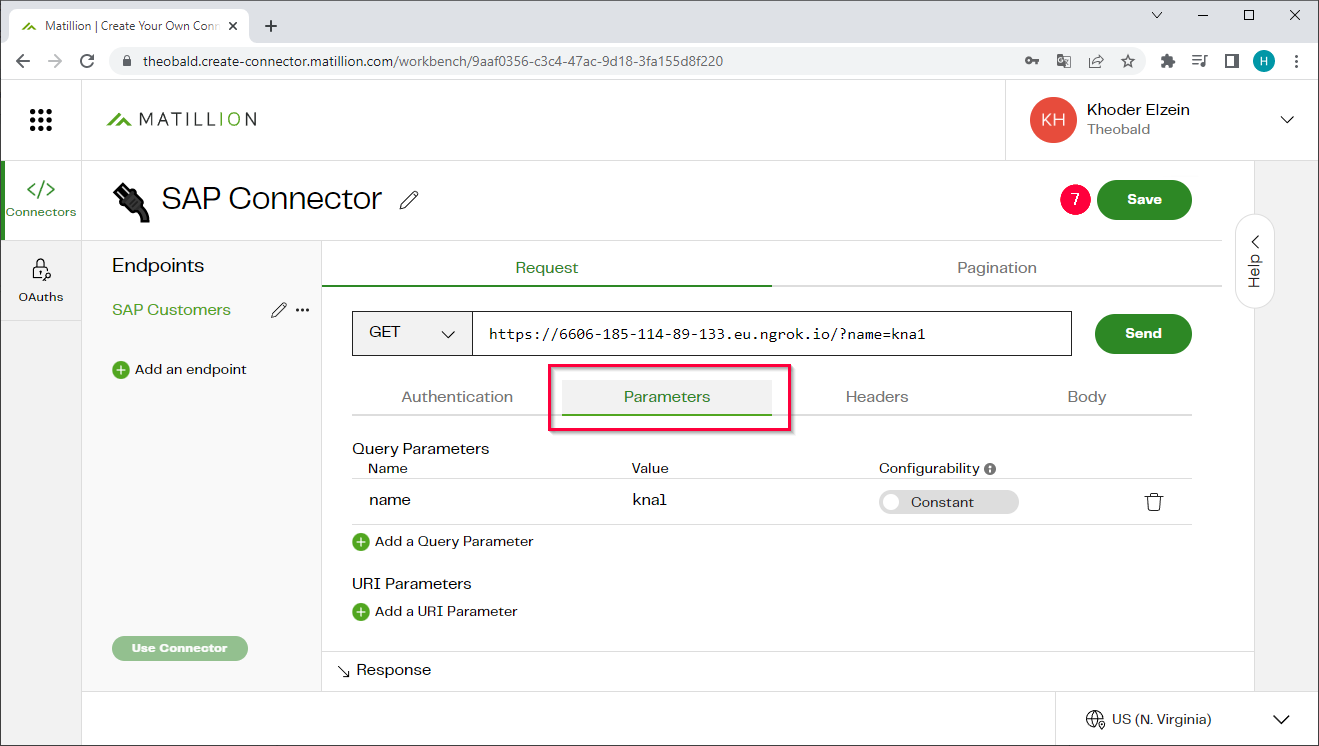
- Optional: If your extraction uses parameters, open the Parameters tab and define the parameters.
- Click [Save] (7) to save the connector.
The custom connector can now be used in a Matillion Data Loader pipeline.
Note: The Matillion Custom Connector must be set to the same region as Matillion Data Loader, e.g., US (N. Virginia).
Create a Pipeline in Matillion Data Loader #
Create a pipeline that triggers the extraction and writes the data to a destination, see Matillion Documentation: Create a pipeline with custom connectors.
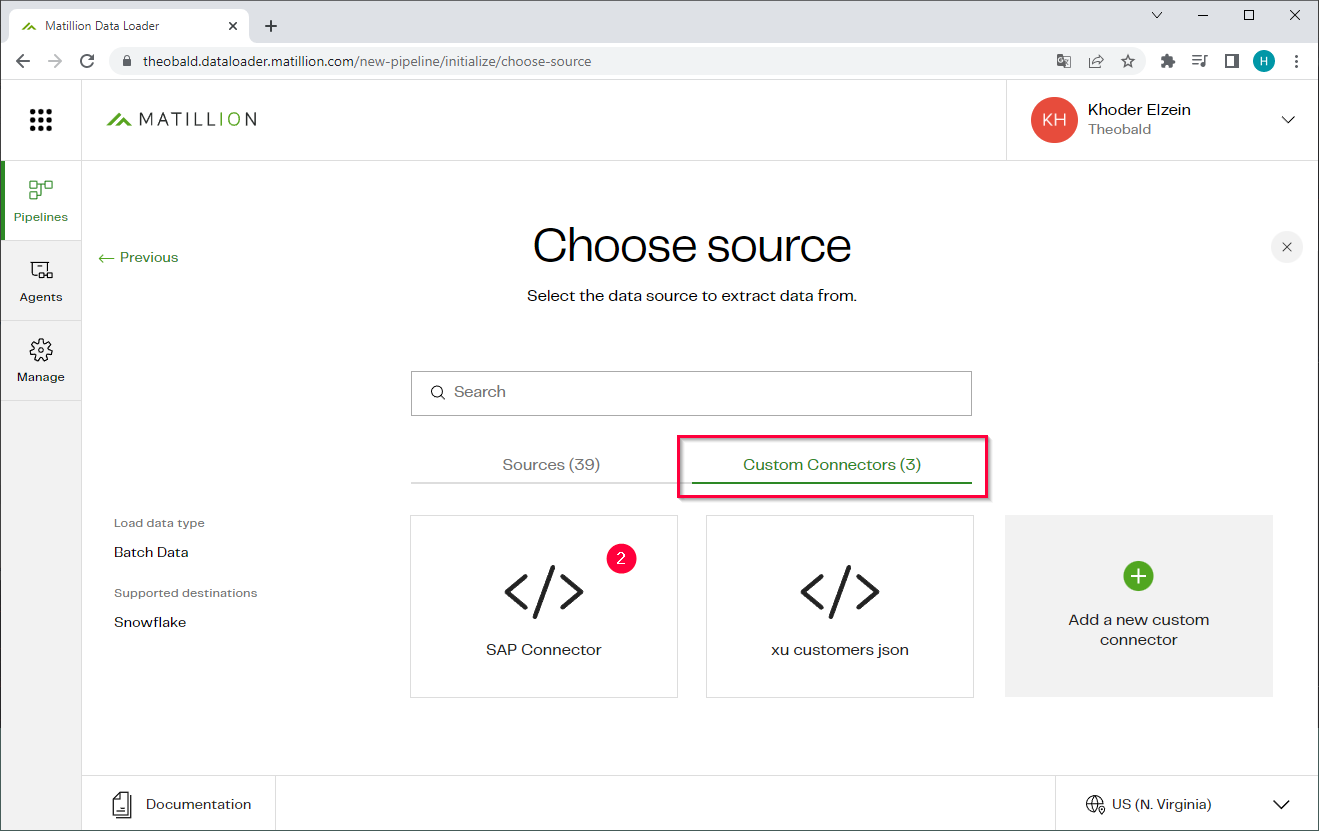
- Open your Matillion Data Loader dashboard under https://dataloader.matillion.com/dashboard.
- Click [Add Pipeline] to create a new pipeline (1).

- Open the Custom Connectors tap to select the custom connector (2), that contains the connection settings for Xtract Universal.
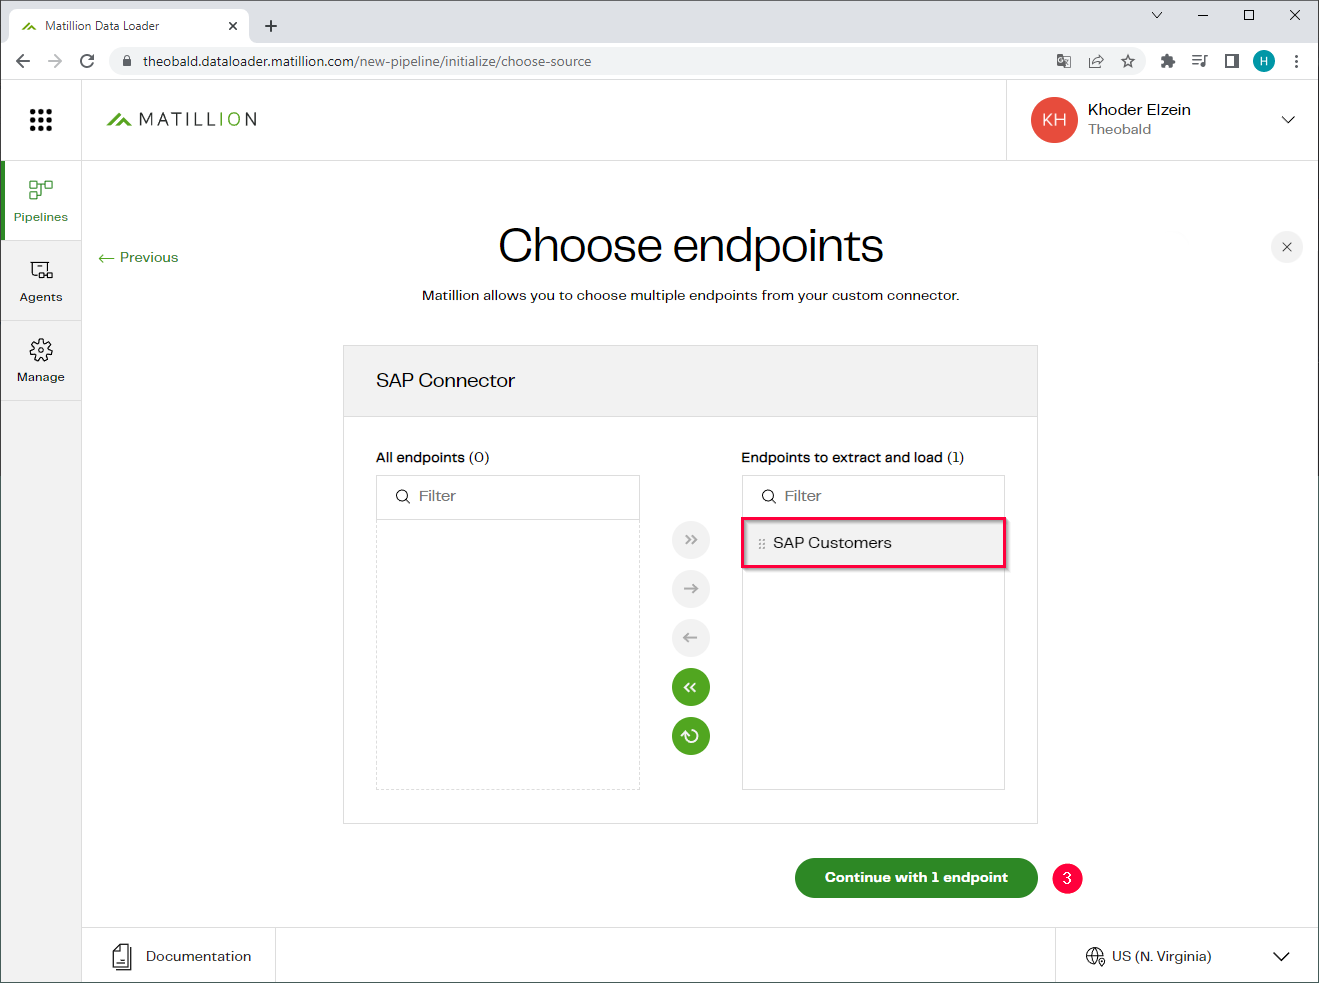
- Select the endpoint that calls the Xtract Universal extraction and use the arrow buttons to add the endpoint to the list Endpoints to extract and load. Note that a custom connector can have multiple endpoints.
- Click [Continue with x endpoint] (3).
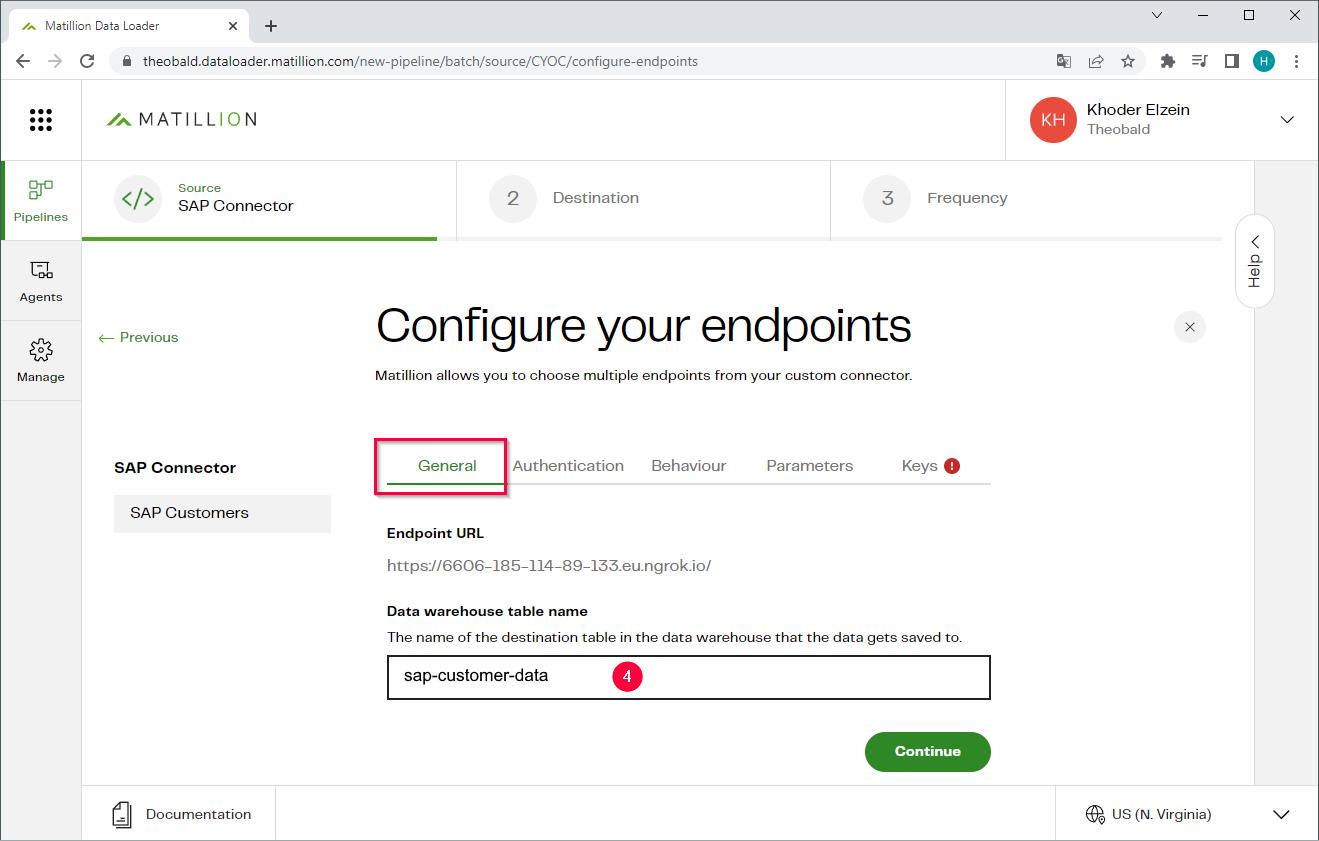
- In the General tab enter a name for the target table (4) under Data warehouse table name.
- Open the Authentication tab and enter the authentication details for the Xtract Universal webservice.
- Open the Behaviour tab and select the elements you want to include as columns in the target table. By default, all elements are selected.
- Optional: If your endpoint uses parameters, open the Parameters tab to define the parameters.
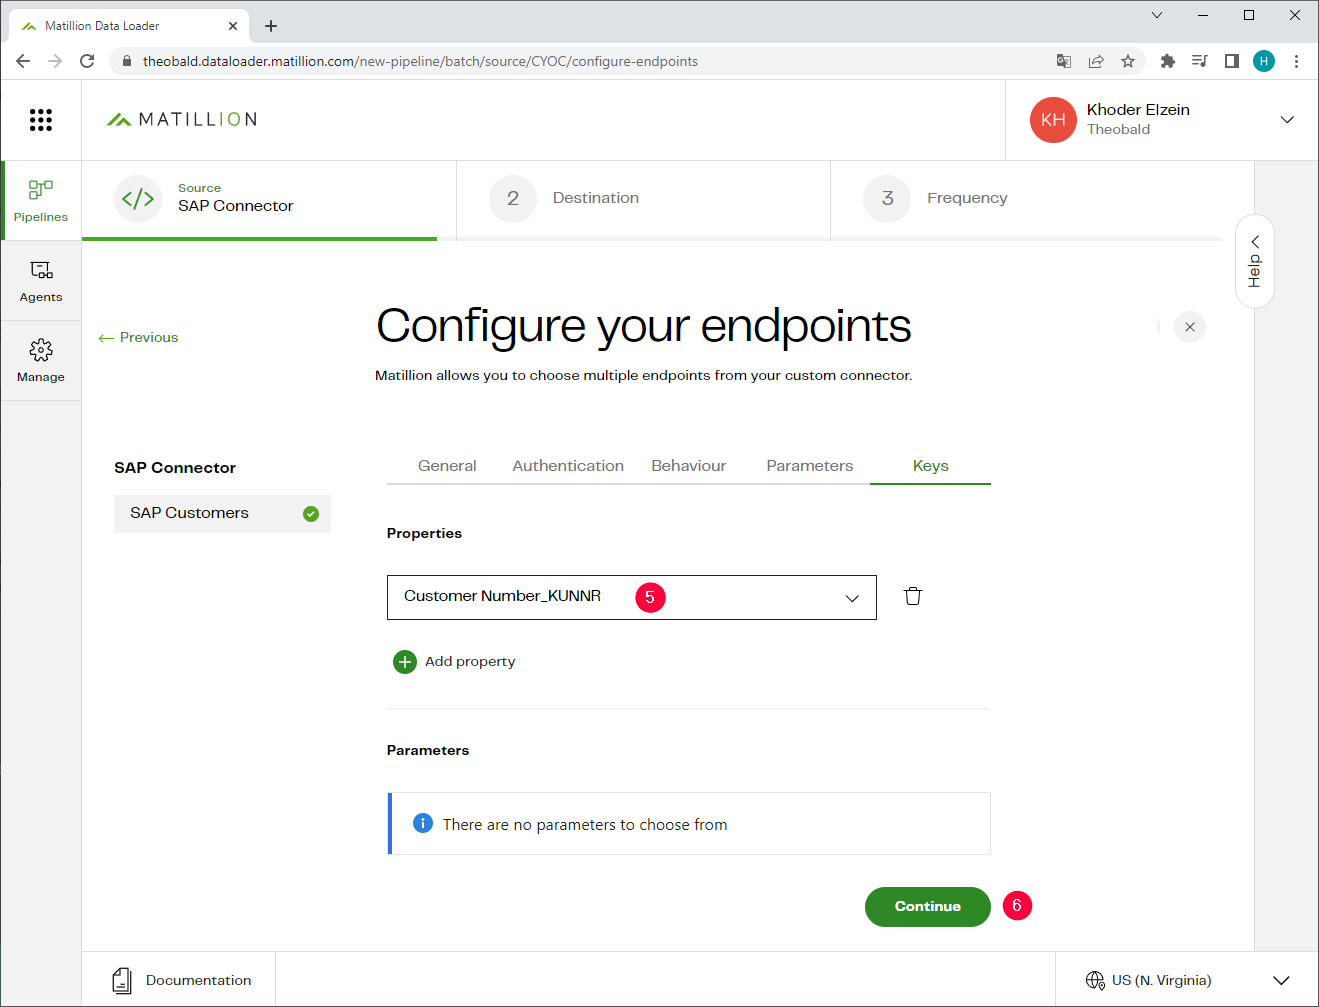
- Open the Keys tab and select a key column that is used to match existing data and prevent duplicates, e.g., Customer Number_KUNNR (5).
- Click [Continue] (6).
- Select the destination to which the data is written to, e.g., Snowflake (7).
For more information on how to connect to Snowflake, see Matillion Documentation: Connect to Snowflake.
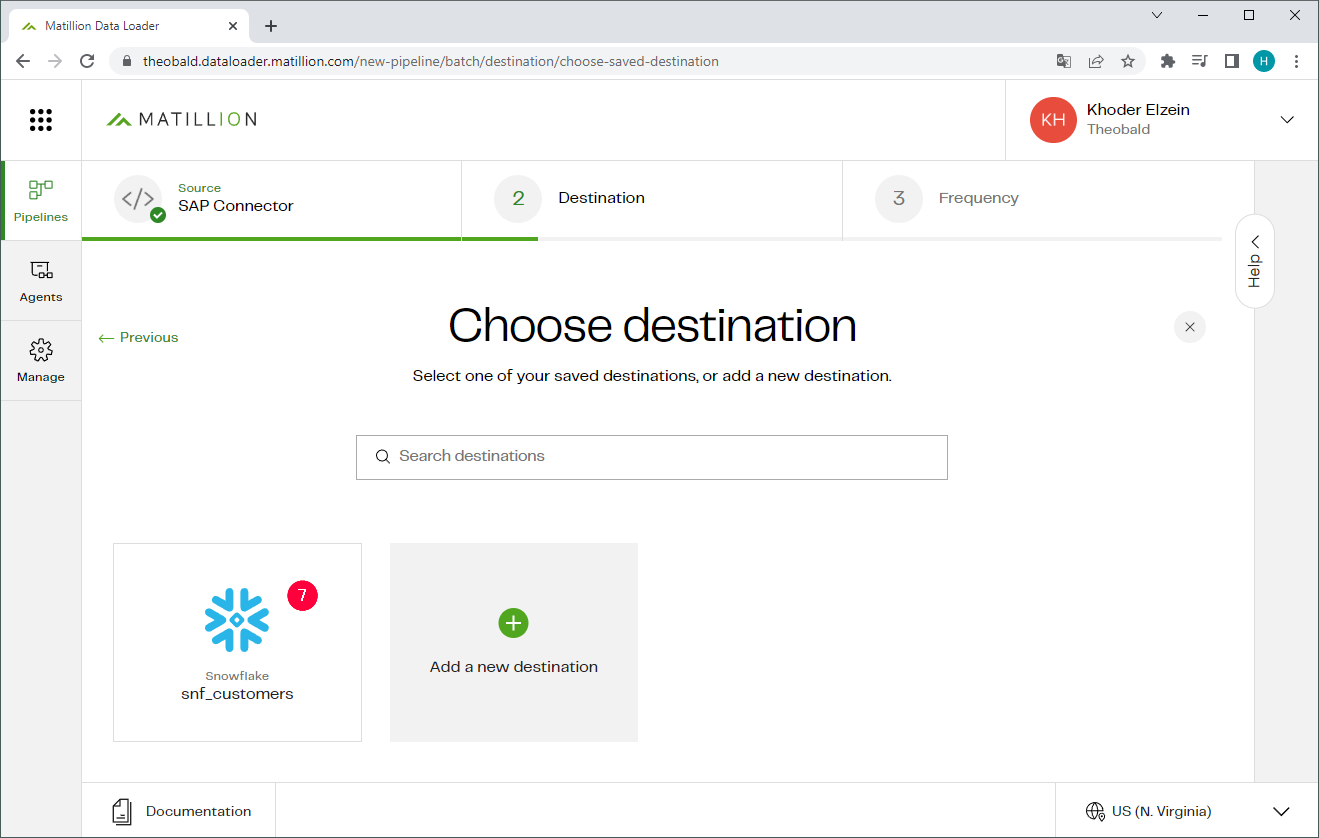
- Configure the destination, see Matillion Documentation: Configure Snowflake.
- Click [Continue].
- Enter a name for the pipeline (8).
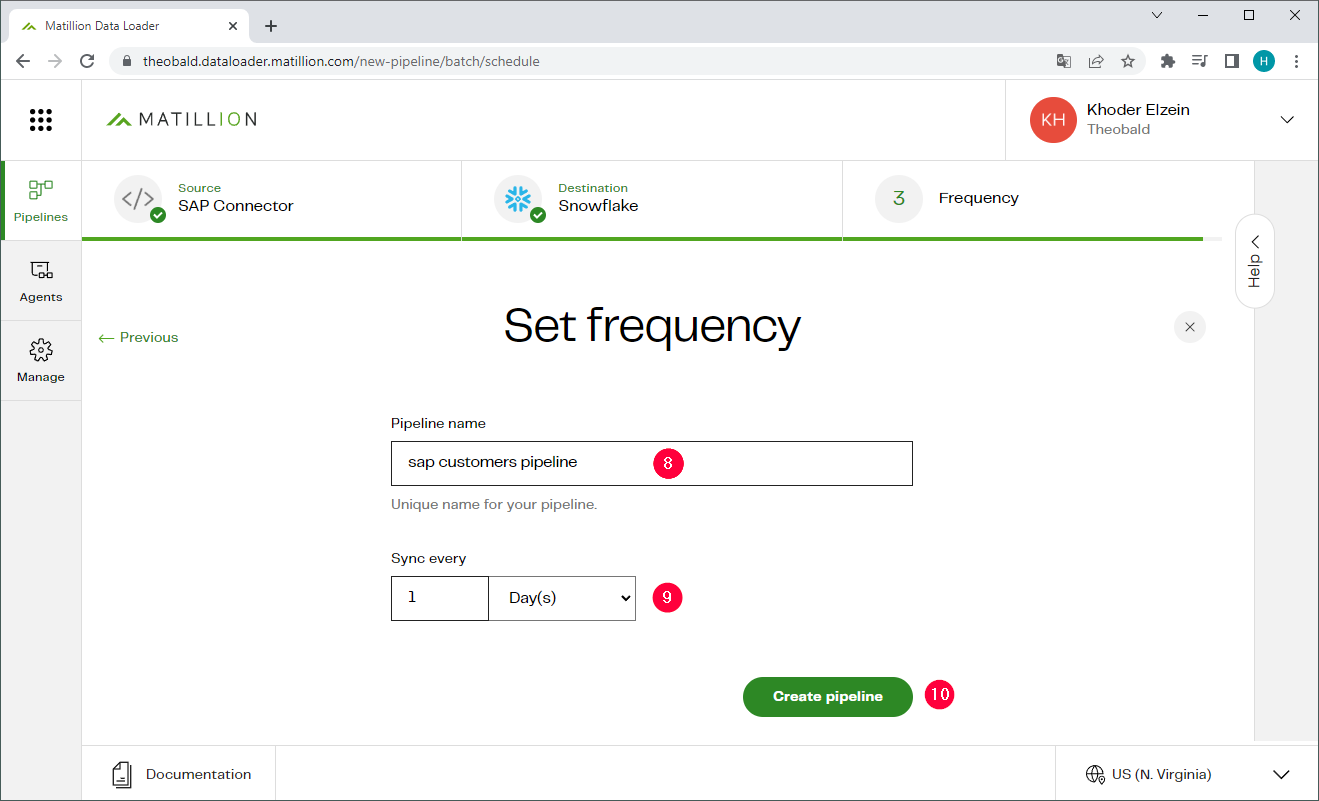
- Select at which interval pipeline is to be executed (9). The pipeline first runs after it is created and then continues with the specified frequency.
- Click [Create pipeline] to create and run the pipeline (10). The pipeline is now listed in your dashboard.
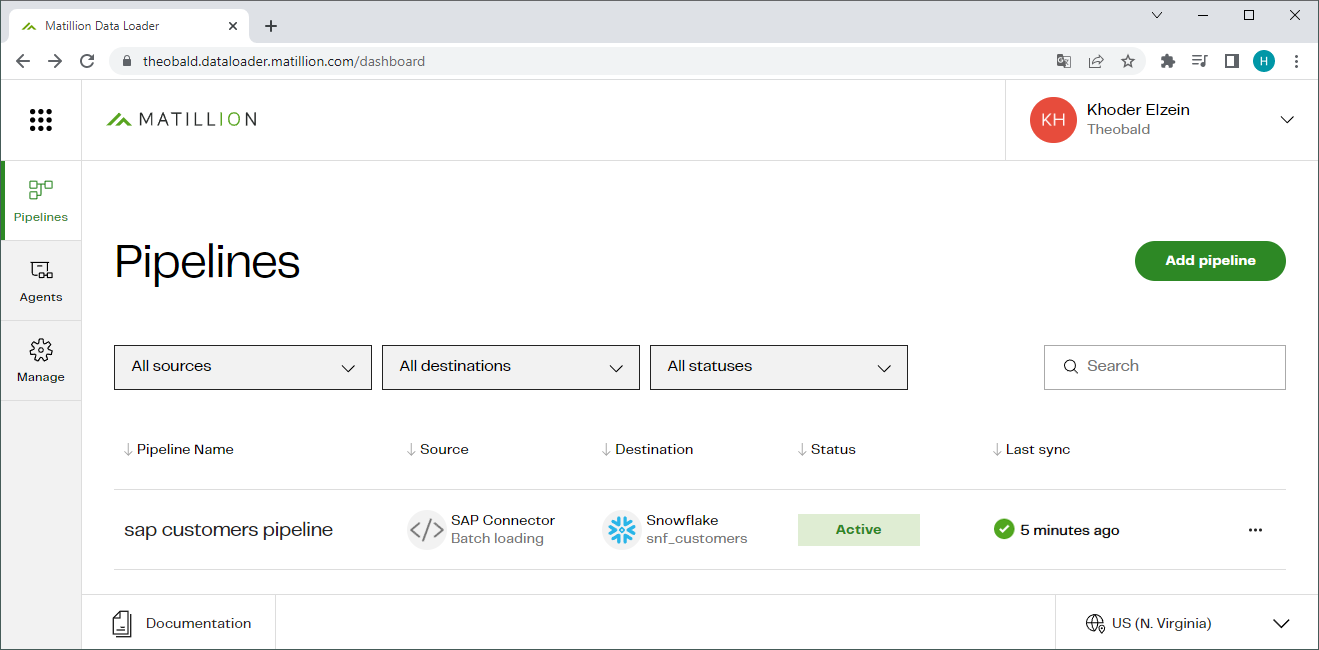
- Check if the data was successfully uploaded to the destination.
The pipeline now runs automatically at the specified frequency.